Thursday 29 March 2012

Nearside Rear Corner

Not content with just working on the front of the van, we decided to do the other rear corner too, so off it came......


The engine post is in really good condition, requiring only a minor repair where the spare-wheel tray bolts into place.

The underneath of the parcel tray still has all the original cable clips in place that holds the wiring for the centre brake light and number plate light

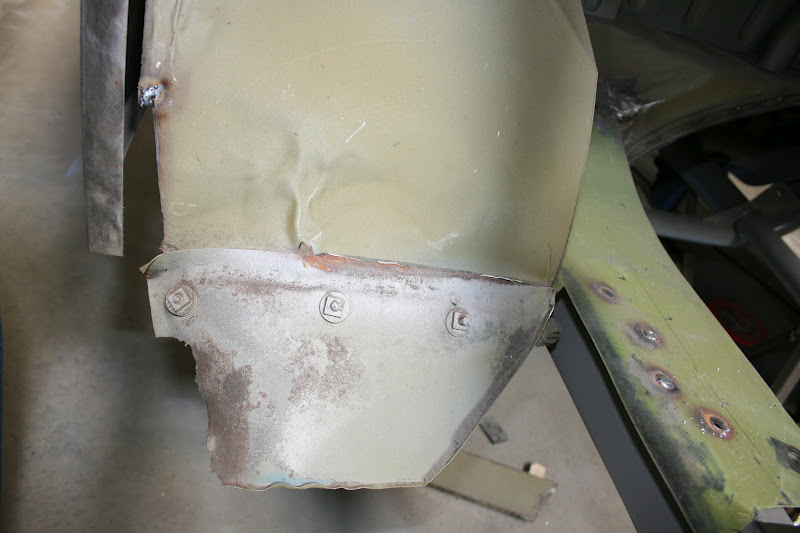
The lower part of the rear wheel arch tub is not so great. The rest of the wheel arch is in good condition. So, this will need to be cut out and replaced.


 The side engine lid support is in really good condition with only a small repair required at the bottom of the foot where it meets the rear valence.

Cab Doors

With the rest of the cab nearly done, thought we'd better sort out the outside of the doors and tidy up the finger recess and the hole for the door handle:

The Barndoor cab doors have the very small recess (same as an Oval window Beetle). The cut-out for the handle is completely flush.

The other side fitted with the NOS handle (this side will actually end up with a non-locking handle being the passenger side).

Dash Pod & Inner Panels

Carrying on in the cab area after fitting the dash top, we've now built up the inner supports that the kick panels go against and the dash pod too.


The 'Y' piece heater tube is now connected to the NOS heater tube that has plates either side that the kick-panels go against.


Saturday 17 March 2012

Dashboard Goes In

After extensive re-working and tidying up, the dashboard is now welded back into place.


Now we can start to fit the dash pod, but first we will trial fit the steering column to ensure that the holes in the floor line up in the right place and that the dash pod is also fitted in the right place.

Inner Windscreen Repairs Continued

After fabricating the two upper pieces above the windscreens, Carl has now welded these into place (copying the original factory weld spacings) and finished off the area above the windscreens and above the two front cab doors:


Here you can see the top of the 'A' post were the door top frame meets with the new part above the windscreen.

Thursday 15 March 2012

Inner Windscreen Tops

There is a finishing piece between the inside top of the windscreens and the roof. We've removed this piece as it had been drilled and bashed about a bit.

We decided to make a new one rather than try to repair the original as it was too far beyond salvaging


Can you see the original spot-weld positions? We've measured these and punched out the exact same locations so the new panel will be spotted in the same place.

Saturday 10 March 2012

Dasboard Repairs

We've been working on the dashboard, getting it straightened out and ready to be welded back into the cab. If you remember, the 'y' piece heater pipe was badly crushed on one side, so carl has spent hours working on this to get the metal back into the exact same shape. Luckily the other side was pretty good so we had a pattern to work to:


There still needs some work to the bottom of the 'Y' piece, but the rest of it is now spot on. The metal square plate in the middle of the 'Y' is where the wiper motor bolts into place.

The vents on the top of the dash now actually resemble heater vents rather than just the slit in the metal they had become.

The dash is now ready for welding back into the cab

Thursday 8 March 2012

Door Top Frames

Carrying on with the cab area, we need to get the door shuts right, and the alignment right, so we need to fit the door top frames on to check that these all line up properly.

Sadly, the original door frames were a bit worse for wear.....


 The entire bottom edge of the 1/4 light frame is rusted out.

And a bit of magic later and the nice shiney new metal is in place.

The 1/4 light frame has been repaired too and the piano-hinge 1/4 light now opens and shuts perfectly.

Piano-hinge 1/4 lights were used on barndoors upto chassis number 20-041711 (basically upto December 1952).

These frameworks can now go off to be blasted ready for trial fitting.

Thursday 1 March 2012

Cab Floor Finished

The cab floor is now all in place. There is one piece that remains as a bolt-in section. The rest is welded into place. The original floor is made up for 5 separate sections.

Here you can see the floor finished and seam-sealer used prior to giving a coat of primer.

'A' Post Modifications

The new 'A' posts that we bought turned out to be the pattern for 1953-55 ones. The change is very minor and hardly spotted until you know what you are looking for.

Below are photos of the LHS 'A' post before we modified it:


On the return lip, the earlier 'A' post has an almost right-angle shaped lip rather than it being flush. Here's the other side now modified to the correct pattern:


The new metal you can see protrudes 7mm from the back of the seal holder strip. The later version from mid 1953 - 1955 was virtually flush

Thanks to 'lowdowndirtyrat' on SSVC for the info before it was too late!!