Wednesday 26 October 2011

Wheel Restoration

We have been restoring the 16" wheels. The back of wheel is stamped with the month and year of production. We have carefully worked on each wheel to get it straight (well round really, but you know what we mean!!).

Once each wheel was perfect again, we have replaced all the hubcap clips and rivets. Here's how to do this on your wheel:

 First, we drilled out the old rivets leaving nice clean holes:

Next we offer the hubcap clip with the rivet upto the wheel.

Turn the wheel over and rest the rivet onto a metal block. This holds the rivet and clip into place. You can see the new rivet protruding inside the wheel.

With a metal bar, you flatten the rivet down which splays the edge of it over.


Here you can see the rivet head has been widened out.


Now, with a rounded peening hammer, you can work the rivet until it is all flat and peened over

Here you can see the finished rivet all nice and flush with the wheel.

And from the outside edge, the hubcap clip is now perfectly secured.

And the finished wheel is now ready for painting (once we've put the 5th clip on!!)

Saturday 22 October 2011

Parts Stashed Away

Every single part that has been put on the van is first photographed and catalogued so we know every single item that has been used.

We've been buying stuff over the last 8 months and thought it useful to have a quick look through what we've already assembled.


Thursday 20 October 2011

New Parts Arrived

We've been acting like kids in a sweet-shop again, as more bits arrived this morning for the van

NOS 6v horn. Don't you just love the huge chunky size of early horns.

NOS ignition switch. This fits into the speedo pod. This is the correct 'HUF' 'p' code key for pre 53 vehicles. Its the same switch / key for the Split Beetle too.

This next bit was the icing on the cake for us. A NOS side cargo door lock unit and keys, in its original VW parts box (no, it wasn't cheap). It almost seems a shame to fit it - we just want to put it in a glass case!!!

Here on the side you can see the logo and the part number stamped into the housing. The part number matches the correct one in the VW parts book (we checked!).

Rear Side Panel Supports

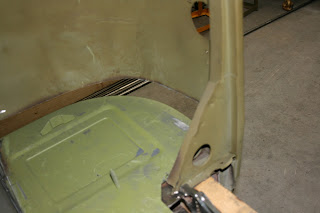
On the inside of the rear side panel are horizontal support pieces. These run from the 'C' post backwards. There are three altogether, here you can see the two upper ones. We have fabricated these and they will be available for sale soon. They are slightly different to the non-barndoor models.

On the photo above, there is another piece that will go in between the wheel arch and the 'c' post, a continuation of the on that goes across the wheel arch. These pieces are important as they give strength to the side panel.

Saturday 15 October 2011

Engine Bay Plates

We've been busy working on the engine bay. Tidying up the firewall and the holes were the starter cable and wiring loom come through the body.

We've also been putting in the Battery Tray and the engine bay side plates:

Here you can see the battery tray and engine bay side plate welded into position:

Don't worry - we cut off the rear corner once we had checked the radius angle and curve on the battery tray.

The LHS engine bay side plate now in position. Here's something to check out: Notice on the inner side of the rear wheel arch - the ribbed fingers protrude 'outwards' into the engine bay..... well now look on the first photo above - the same fingers protrude in the same direction, but into the wheel arch - therefore VW used the same panel for both sides and just modified the top of the LHS one to accommodate the fuel tank.

Here you can see the Battery tray from the underneath. There is still more work to tidy up the welds here.

The LHS engine bay side pate from the underneath - the captive nut was taken off the original panel and re-welded onto the new piece.

You can buy battery trays and engine bay panels for your split van by clicking here.

Rear Wheel Arch Tub

We've been working on the rear wheel arch tub now that the rear 1/4 panel has been taken off. We can easily get to the wheel arch and carry out the repairs necessary.

The lower horizontal support piece has been put into place now (we will be listing these support pieces for sale on our website soon). There are more of these to go higher up once the 'C' post as been repaired.

Work in progress: This is the bottom front leading edge of the inner rear wheel arch. This still needs a lot more work to get it correct. Note that the Barndoor ones are completely smooth and only later vans have the 2 ribbed pieces in them.

The lower curved edge of the wheel arch tub meets perfectly with the inner sill. The inner sill is then spot welded to this leading edge (we took the positions for the spot welds off the old panel before it was cut out)

From the 'inside' of the wheel tub, you can see the two panels now in place - again there is more 'tidying' up to do to make this look perfect. The outer radius curve gives you the curve for the complete outer panel and we have trial fitted this too to make sure all the angles and curves are correct.

From the inside looking towards the rear of the wheel tub, you can see the repair piece we have let into the end of the arch and the finishing piece (or mudflap) that attaches to this. Again, we took the spot weld positions from the old panels before they were cut out.

We supply all these small repair panels for the rear arches - click here

Thursday 13 October 2011

Ultra VW Magazine

The guys over at Ultra VW Magazine are doing a step-by-step feature on our Barndoor restoration, which is really cool. Check our their site here and make sure you buy the next copy of Ultra VW Magazine!

Monday 10 October 2011

Chassis to Body Trial Fit

After spending weeks and weeks working on the chassis, we thought it might be a good idea to check the body still fits on to it.

So, we cut the old floor out (it had virtually dropped out itself), raised the van up and pushed the chassis back under.

We lowered the body down and it fits perfectly onto the chassis. Everything lines up beautifully. We're really chuffed. This was a major milestone in making sure this fits and lines up. Now we can push on welding panels into the rear engine bay knowing all our datum points are correct and everything fits properly.


Rear Firewall Strip

The rubber seal over the back of the engine and above the gearbox slots in place into a grooved recess on the engine firewall. This was in a bit of a poor state:

We cut this channel off so we could work on it properly. Then we could tidy up the bodywork behind it and get this all straight and smooth again.

Once we had re-worked the channel, it was spot-welded back into place using all the original spot welds.

We can now trial-fit a seal into this and re-shape the recess lip back to the original. With this channel back into place, the whole engine bay has become much stronger.

Friday 7 October 2011

Seat Stripping

We've started to strip the front bench seat. The seat from the van is an original one that has not been messed with. This allows us to see where the original stitching goes and how the seat cover is fixed to the seat.

Once its stripped, the seat can be blasted, repaired and then powder-coated prior to being re-trimmed.

You can see here the stitching in the side of the seat:


In the bottom right corner of this photo, you can see a wire running through the edge of the seat cover - this is very important - you'll see more below

This wire is stitched into the hem of the seat cover and is what helps to keep its shape.

 There are two support bars that run front to back on the seat - these are intact

The wire that you saw above running around the hem of the seat, well in the middle, the wire comes out, and its stretched tight and wound (3 times) around one of the seat springs - the re-trimmed seat will have this also!


This is where the wire comes out of the hem and goes forward to keep its tension


Here the wire is wound three times around the seat spring.