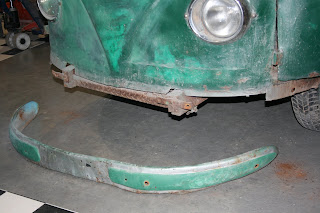
The last box section that the cables / conduits go through which is mounted above the rear torsion tube was in a bad state. These are not panels that are commercially available, so Carl had to fabricate them from scratch.
Tuesday, 16 August 2011
The Chassis Gets More Welding!
Both sides of the rear chassis legs are now in place and the rear cross member is in place.
The 'top-hat' section is offered up to check the level
Got rather carried away: 'I' beam in place, 4 rear outriggers in place, centre heater tube in place.
Welding The Chassis
The first chassis leg is now welded into place. Before this, the chassis piece was measured, cut and then drilled for the spot welds. The spot welds were first measured off the existing chassis to ensure that all the spot welds are positioned in the exact same places as they were from the factory.
In the pic below, the rear chassis leg is offered into place with the closing panel that Carl fabricated. All these are dummy fitted first to ensure everything is perfect before welding:
The spot weld holes are marked in place before drilling after carefully measuring these against the position of original factory ones.
Rear chassis leg and closing panel now in place. The rear cross member is offered up to check the fit.
Monday, 15 August 2011
Measuring Up The Chassis
Very, very detailed measurements have been taken of the chassis. Datum points have been marked onto the floor to give us the centre points of all the important parts such as outriggers, rear chassis cross member, etc. Whilst this process was VERY time consuming and slow, it makes re-assembly very easy because we know exactly where each piece should go:
Picture below shows the two central datum points on the chassis - this is where the two halves of the chassis rails join together
The angled pen line on the photo below is where we will cut the chassis - everything forward of this point will be replaced with new parts.
Picture below shows the two central datum points on the chassis - this is where the two halves of the chassis rails join together
The angled pen line on the photo below is where we will cut the chassis - everything forward of this point will be replaced with new parts.
Removing the Chassis
We took the unusual step of completely removing the chassis from the van. Whilst this is not an easy step, we decided that it was the only way to ensure we get the high level of detail we want from the restoration. Carl very carefully cut away the chassis from the van leaving it easy to detect how VW had originally assembled the chassis so we can reproduce it spot-weld by spot-weld
In this picture, you can see where the last cross beam has been cut, but left on the chassis so we can see where VW welded it on so that we can do the exact same:
The rear heater tube has been cut leaving part of the floor on it - again, the heater tube welds to the floor. This can now be repaired properly then when the floor goes on, welded to it the same way it was in the factory:
The chassis removed in its entirety. Most of the front section is wrong for a '52 model, so will be replaced with correct pattern panels:
The front of the chassis had a horrible home made box section for the front cross-member - obviously that is going!!!
The rear part of the chassis is not in too bad repair. There is a split on the nearside rear chassis leg that needs repairing and the gearbox mount wants tidying up where a later box has been fitted
Here Carl is measuing the datum points in the chassis to take measurements to get all the new chassis pieces in the exact postion. Otherwise the body won't fit back on properly!!!!
.
Collecting the Shot-Blasted Van
After only 3 days, the van had been blasted:
Back in the warehouse - we were REALLY impressed with the blasting carried out - not one panel was warped - they really took their time doing it properly.
Back in the warehouse - we were REALLY impressed with the blasting carried out - not one panel was warped - they really took their time doing it properly.
Off to the Blasters
10th May - with the van fully stripped down to the bare shell. The Shell was securely loaded onto a trailer for the trip to the Blasters:
We used a company in Coventry called BG Penny's to do the blasting work. Here the van is arriving at their premises:
The van was completely blasted using a combination of chilled iron filings, plastic beads, glass beads and finely powdered garnet.
We used a company in Coventry called BG Penny's to do the blasting work. Here the van is arriving at their premises:
The van was completely blasted using a combination of chilled iron filings, plastic beads, glass beads and finely powdered garnet.
The strip down continues
22nd April - we continued to strip parts off the van ready for its trip to the blasters. We removed the wrong front beam - a later one had been fitted.
One of the side doors coming off:
Gearbox came out - we think this is also a later one!
One of the side doors coming off:
Gearbox came out - we think this is also a later one!
Sunday, 14 August 2011
First Strip Down
12th April. Our first strip down of the van. Everything has to come off the vehicle before it can go to the blasters to be blasted to remove all the rust, crud and other stuff we don't want. Here we are removing doors, dashboard, and anything else we can get at with a screw driver!!
The speedo pod off the dash
Collecting the 1952 VW Barndoor
Here we are collecting the barndoor ready for its trip back to our warehouse for the restoration to commence
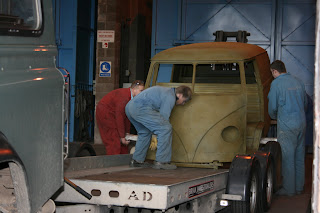
Here it is securely loaded onto the trailer:
Arriving back at our warehouse in Rugby, Warwickshire (feel free to visit us some time)
Rolling off the back of the trailer - no brakes!!!
Being pushed into the warehouse ready for the restoration to commence..........
Here it is securely loaded onto the trailer:
Arriving back at our warehouse in Rugby, Warwickshire (feel free to visit us some time)
Rolling off the back of the trailer - no brakes!!!
Being pushed into the warehouse ready for the restoration to commence..........
Subscribe to:
Comments (Atom)


