Yep, we took and angle-grinder to it and cut the side off the van! Have we gone mad? Well, no (well not totally).
The original side as you can see below was badly damaged, dented and had been poorly repaired in the past. The only way to get it straight was to cut it off and put a new one on:
Then we cut it off:
First Carl cut out a section inside the edges so we can see where the original welds go. The strip left in the middle is where on of the side support pieces is welded.
The inside of the cut-out piece. We can use this to take measurements for the spot-welds when the new panel goes on. The very bottom of it shows the lower side support piece (well, what's left of it).
The pic below shows the upright support and the upper side cross support
There is is all removed now:
The inner rear wheel arch is in really good condition. There is some work to do to tidy up the bottoms of the arch. We can see here where the spot-welds are on the arch to the outer skin. We'll replicated exactly the same spacing on the spot-welds on the new panel.
There's been a small repair on the front edge of the arch, that will need fixing, as even though its not rotten, we're not having any 'visible' repairs on the van and certainly no filler.
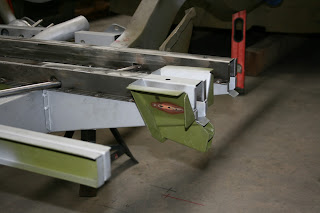
You can see the small 'foot' at the bottom of the vertical support bar. This small box-like plate sticks up slightly from the wheel tub and locates the vertical support bar. This is all nice and solid, it wants some tweaking to get it perfectly straight again, but its original factory metal.
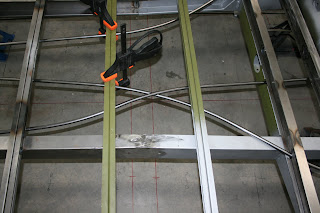
Here you can see the upper horizontal support bar. This is not good enough to salvage, but we can use it as a reference to make the new one and take the measurements off it for the spot-welds so the new one is welded in exactly the same position as the original one.
The new side panel is clipped into place to check its position. To buy your new complete side panels, click here!
The seems are looking good for a first fit!
From inside the engine bay (yes, the firewall needs work, but we haven't got that far yet)
From inside the van:
Friday, 23 September 2011
Inner Sills
The Inner sills are now fitted onto the chassis. They were all drilled first and spot welded into place. The spot welds are in the same position as factory spot welds. This more-or less completes the chassis work for now.
The inner sills are NOT sided, and are the same on all model years of split van. Click here to buy inner sills for your Split Van.
The inner sills are NOT sided, and are the same on all model years of split van. Click here to buy inner sills for your Split Van.
The 'Before' Photos
We really should have started with these, but here's some pics of the van as we bought it before we did anything to it:
Thursday, 22 September 2011
Parts Bought
Over the last 5 months, we've been busy assembling as many parts as we can ready for the re-build. Nearly all what we have managed to source has been new-old-stock or the very best 2nd hand. Here's a snippet of some of the goodies we've got stashed away ready to be fitted:
NOS Cab door handle with correct 'HUF' keys
1952 Only rear tail lights
Centre brake light / number plate light bulb holder unit
Centre brake light with correct orange brake light lens
Semaphores with large VW logo
Correct pre '53 barndoor only opening 1/4 light catches. These are for the 'piano' hinge type of 1/4 light
25hp domed top oil cooler.
NOS 25hp Cam shaft (still in its box!)
Correct Hella rear reflector
Plain domed hubcaps ready for paint:
Correct flat-topped distributor unit - for 25hp engines
NOS Brake shoe linings:
Saturday, 17 September 2011
Rear Jacking Points
The Rear jacking points have now gone on. These line up with the 2nd outrigger along, and not the very back one. You can purchase new jacking points from us here. You can see the two rear jacking points in place below:
More Cable Conduits
All the rest of the cable conduits have fabricated and welded into place. The chassis now looks like spaghetti junction with all the conduits now in place!!!
Thursday, 15 September 2011
Cable Conduits
All the cables (handbrake, clutch, heater, accelerator and choke) all run in metal conduits under the van. Of course, these are not available now, so we sourced some exact tubing and have fabricated our own.
The conduits are in the exact same position that they were from the factory. All have been bent and shaped to the original positions.
The conduits are in the exact same position that they were from the factory. All have been bent and shaped to the original positions.
Subscribe to:
Comments (Atom)


