As we've put a new clip on the front of the van, we wanted to keep the original dashboard out of our van. So it got cut up:
Here looking from the back of the dashboard:
You can see its like 'machine gun alley' with all the holes in it.
The 'Y' piece will get removed, split into two and repaired.
In the bottom left of the picture, the 'Y' piece is badly crushed. Thankfully, the other side looks nearly perfect so we have a shape and contours to follow:
The horizontal support pieces here are badly out of shape - they should be straight!
The two tabs sticking out from the underneath of the dash are where the speedo pod locates. The 'tray' that the pod sits on has been moved in the past, so this will be re-aligned
The vertical tube is wrong, it should have a opening section to allow heat into the cab area.
The 4 holes in the flat bit of the dash are where the passenger grab handle is fixed to the dash. The other holes are being welded up
Friday, 24 February 2012
Finishing Off Seat Bases
The Seat bases / inner wheel arch tubs are now finished off and seam-sealed as appropriate.
The whole front under-seat cab section is now virtually complete.
Looking from where the wheel will be you can see the arch of the front chassis rail in the bottom right of the photo. The Front beam will be mounted here. You can see the frame liner going upwards from there where it meets the wheel arch tub.
Back section of the wheel housing area. You can see the bulkhead panel forms the back of the wheel housing section with the chassis frame line meeting it at 90-degrees.
Looking directly upwards, you can just see the edge of the outer front wheel arch framing the top edge of the photo. You can see the 'X' pattern pressing in the wheel housing (more details on this below).
Here you can see the wheel housing panel at the front of the wheel tub, here it comes down and meets the cab floor. To the left of the photo is the box section of the front outer wheel arch (this is actually made up of several sections).
The 'X' pressing was introduced on the Barndoor sometime between chassis numbers 20-04639 and 20-05385. It continued with this pressing upto 1955.
Here you can see the back of the wheel housing showing where the outer wheel arch meets the Bulkhead panel and the 'B' post where it comes down to meet the chassis.
Thursday, 23 February 2012
Centre Seat Box
The Centre seat box fits between the inner wheel arches under the front bench seat. This panel has the hole in the top for the storage of the tool kit.
This particular panel changed frequently during the production years as the choke cable / heater cable was re-designed and re-located. For our van, there is a very specific 1952 only version, from chassis number 20-14685 through to 20-41711 was the type we have.
Luckily, the original centre section was included in the van when we bought it, but to say it was 'rough' was an understatement! It had been cut about and had a hole cut for a radio, so it needed a lot of work!
Here the tool box is now in place with all the wrong holes welded up and the bottom edge has been repaired. The tubes for the heater cables and the choke cable are now in line too.
Wednesday, 22 February 2012
Front Wheel Arches
Now that the 'A' post and 'B' post pillars are in place, we can fit the wheel arches into place and then work on the cab door alignment ensuring the door gaps are perfect all around and match on each side.
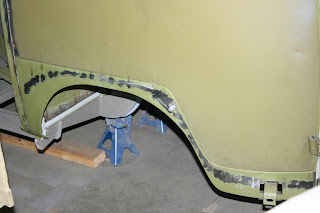
Offside front wheel arch in place. Nice alignment along the bottom edge of the door. The bottom of the wheel arch lines up nicely too with the 'B' post.
We'll trial fit the bumper again to ensure the bracket lines up as now is the time to make any alterations!
If you need to repair or replace the front wheel arches on your split screen van - click here - we carry a range of complete arches or inner / outer sections and in a wide choice of qualities to suit all budgets
You'll notice we've welded the doors shut too. Once we've got the gaps right, we want to keep it right, so by welding the doors shut, we preserve the door position whilst we make any further alterations.
Hidden Treasure....
Sometimes you do find a little bit of a surprise during a restoration....
When we originally bought the van, the semaphores had been welded up on the B-pillars. When we came to replace the B-pillars, we just cut the whole lot out, only then did we decide to cut them open..... guess what we found on one side:
Yes, one of the original Barndoor semaphores had been welded up inside the 'B' post! Its beyond repair, but a really nice find. Will go in one our display cases in the showroom. We've got NOS ones to go in the van, but it was nice to find one of its originals.
Thursday, 9 February 2012
Front Valence
Now that the A-posts are in place, we can go about fixing the lower front valence into position. This has the holes cut out for the front bumper irons to go through.
We have modified the lower valence where the holes are for the bumper irons. The panel comes with perfectly oblong slots with 90-degree corners. The original slots were rounded on the corners and the slot was not perfectly level with the top of the panel, but lower down, so we've re-made the slots by welding up the incorrectly cut hole and dropping in the new slot cut from an original lower valence.
The correct shaped slot now showing in the lower valence (yes, we know you'll hardly see it once the bumper is on but......)
Friday, 3 February 2012
'A' posts
Continuing the theme of re-building the cab area. The 'A' posts are now being put into place. This will add much more structural integrity to the cab area.
The RHS A-post is offered up and door alignments checked. We've cut away part of the windscreen frame to allow the A-post to sit properly up into the roof.
We took measurements off the original panel and also off another front to ensure we get the exact gap between the A-post and the centre division. If this was wrong our windows and seals would not fit properly.
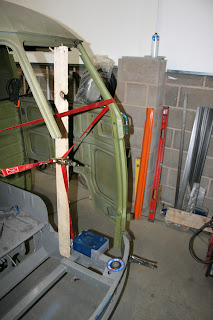
Here we have used a ratchet strap to pull the A-post further in to get the exact postion
LHS 'A' post offered into place. The door is fitted to again check the alignment and ensure exact positioning. The LHS front roof had dropped 20mm from its original - probably due to a front-end collision in its life and bad repairs. Here we can now correct his and get the roof line and A-post all perfectly back into place.
With both A-posts now in place, we can work on the front panel and front valence sections. Once the front panel is in place, we can work on the inner wheel arch tubs and the cab floor.
Thursday, 2 February 2012
'B' Posts
After cutting off the cab and the side panel, we need to get some support into the front cab and ensure the lines are right for the long side panel.
LHS 'B' post upper section - we've cut off part of the upper panel to fit this in properly. We need to make sure the door shut line is perfect too. You can see the mounting plate for the semaphore and the fixing screw for it.
On the other side of the van, the B post contains the slot for the semaphore built into it. Here we've cut away part of the door surround part to neatly fit the B post into place
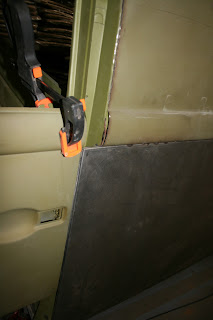
Door gap sorted, the doors are then welded into place to keep the gap perfect at all times.
Subscribe to:
Comments (Atom)


